home |
emulator |
tapes |
information |
help |
contact |
Help: Tape Capture & Restoration
Introduction
Probably the biggest companion of the ZX Spectrum and many home computers of the time is the audio tape and with age this type of media can be susceptible to degrading, With todays media having the ability to store many thousands of bytes for very little cost digitizing tapes is a great way for preserving the data which on them. However.... this is not always as straight forward as you would hope for!
Requirements
1. PC with a sound card ( pretty common on motherboards these days )
2. Tape deck ( a means to play the tape! )
3.
Audacity ( its open-source, works well, and free https://www.audacityteam.org/ ) or an alternative sound capture and editing program
4. Connecting leads, to plug your tape deck into your PC's line in port, the ones that were included with spectrum work well if the 1/8th jacks fit both your PC and Tape deck.
5. A registered version of the emulator
Optional: Jewelers screwdriver, Isopropyl alcohol cleaner, Cotton bud, Demagnitiser tape, a tape you don't care about!
Preparation
Before we start if the tape deck you're using hasn't been used (or cleaned) in a while this is an opportunity to do that now as we start out capture process its important to get the best signal we possibly can it can save you hours of work later or even the possibility of have a capture which is non-repairable.
Cleaning Tape Deck
The head on the tape deck with what collects the magnetic field from the cassette tape itself as this tape passes the head meter on meter the dirt can left behind on the head, So with tape deck unplugged from the mains, and lid open using a cotton bud dipped (not dripping) in isopropyl alcohol gently move this back and forth across the head, give it 30 seconds then repeat, you can also wipe along the rubber pinch roller not a lot as it may degrade the rubber wheel, additionally you can clean the record head which is the other end from the pinch roller, now let this evaporate / dry for 5 mins.
Before moving on to our cherished tape using a new blank (which you can still buy cheap £1 from many home shops) record thats right record a couple of minutes doesn't matter what... just we need the tape to wipe across the heads, after this rewind the cassette and play the several minutes, then we are ready.
Alternatively you can do this step using a demagnitzer tape.

| A | Tape deck Head Cleaning | |
| B | Pinch Roller |
OK now our tape deck it tried tested it wont eat our tape and the heads are clean, lets start.
Capture Procedure
We will be using Audacity however much of this will be the same for other programs or consult the internet or manufactures documentation for further details.
Plug our tape deck into the 'line in' on our PC using our ear/mic lead and start up
Audacity
Select the input you are using, As of writing the the latest version of the software a microphone icon is at the top drop down the list box next to it to choose the 'line in' next to this is the channels box drop this down and choose 'Stereo' it can work on 'Mono' however you will loose 50% of your waves amplitude as the channels will be blended, But if you are lucky enough to own a stereo tape deck and the tape is recorded on both channels this will double your chances of getting a good capture if one of the channels has an issue.
Note: Its a good idea not have any other programs or intensive background processes going which could interrupt the capture wave.
Volume Setup
Now place the tape in the deck rewind it and then press play, On Audacity press the round red Record button and wait a few seconds for the tape to get to the first part of the data once the sound come through to the PC you will see the wave being captured, adjust the volume on the tape deck so you get around 80-90%the of the space taken up by the wave you don't need to fill the space but bigger is better until it clips the end then back it off (don't worry this is a test run, you don't want to adjust the volume whilst capturing for real), additionally you can adjust the gain inside Audacity to help get the best wave volume. Note: its common for the volume to go up or down considerably either in waves or just for entire chunks it really depends on the the quality of the tape, how it was made and how its been stored.
Once the tape has got to the end of the side zoom out on Audacity and view the entire wave to see if the volume is about the best you can get from it without it clipping, If not delete the wave, rewind and repeat this volume setup.
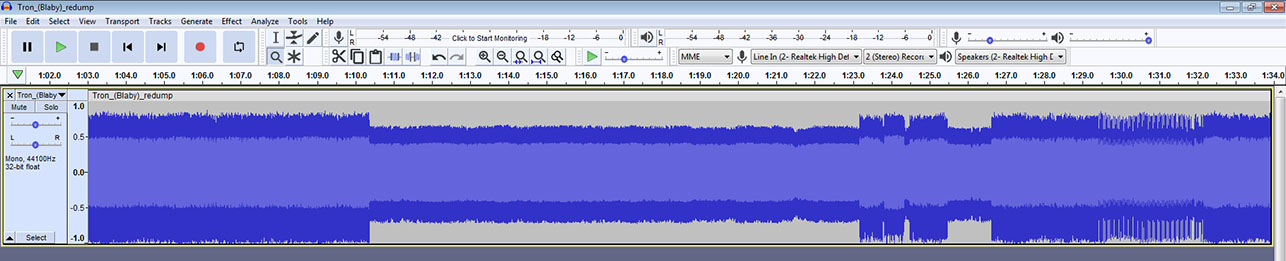
Notice above how the overall amplitude of the wave differs across the entire tape, So the best we can do is to set the volume to the loudest part without going over the max (click image for fullsize)
Additionally on the wave above you can also see from the loudest sections of the wave it is negatively biased (low on the centre line) this can be adjusted out if you are feeling brave!?! this is optional as now we have our new restoring tools via software this shouldn't be needed! On most tape decks you can use a small screwdriver to the adjust the head height this will adjust how the wave sits over the centre line, you want it as close to the centre line as possible to the wave goes equally above and below it for the largest span, this way later on our code will have better chance of picking out the data.
Capturing
Now you are happy with the volume setup, delete the wave, rewind the tape, press play and then record on Audacity this time do not touch the volume control (the interference crackling from the electronics can ruin the wave, best to go get a cup of tea and wait, also PC leave alone, If you get any pausing of glitching from the PC this can ruin the wave.
When the tape has ended stop the capture and again zoom right out, Select the 'Audio Track' drop down box and choose 'Split Stereo to Mono', now close the empty track with the cross on the top left, you can highlight the ends if there is a long lead in and out of silence and press Del to remove those sections but make sure it is silence!
We now have our main capture we need to save it before we can try and load it!
In Audacity go to 'File' | 'Export' | 'Export As Wav', 'Wav (Microsoft)', Encoding 'Unsigned 8 bit PCM', Choose a location and a file name and press 'OK'
Loading
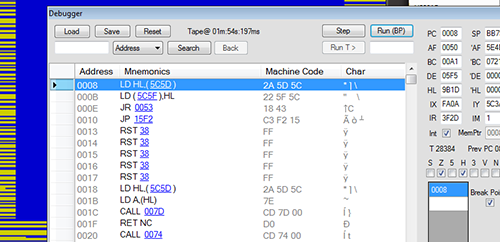
Open the emulator, select the correct model then drag and drop our new capture file on to the 'TV' the tape will now begin to play, Press 'F12' to open the debugger and add a break point @ #0008 this is where the errors are called too ( 'IF' there are any hopefully this will be called and help us locate the issue)
Note : Custom loaders may not use this address for errors and if so they wont show up here, So you'll have to do more disassembling / debugging to investigate!)
Press 'ESC' and we wait to see if the tape to loads or not ( if you don't have several minute to waste... like me you can check the Menu | Tape | Fast Loading to 'ON' and it will seconds.
If the tape all loaded OK, Congratulation !!! !You've now preserved your treasured tape and you duplicate and archive it for future use, you could even back it up on to a new blank tape!!!!
However if your still reading... We aren't done yet!
Restoring the tape data
Did anything load? Did the 'Debugger' fire?
Seems our wave isn't good enough, Lets use some 'AI' to read the tape and help us rebuild the wave (OK its not so much AI but more of some algorithms.. but AI is a great buzz word at the time of writing 2022) and with modern computing power the analysing will process the entire tape in much less than a second, in fact at development a 5 minute tape with 13 million samples takes around 90ms!!
NOTE: This part has now been greatly improved with the new Sound Lab
Go into 'Menu' | 'Tape' and set 'Wave Det' to 3 or so, close the menu and drag the wave file back on to the emulator this time the emulator will go through the wave and attempt to detect the wave. Did it load? No, then up the value in 'Wave Det' by 1 and try again, Each time make sure you change the value then re-drag and drop the .wav file on to the emulator to be re-read.
Hopefully we now have a working tape file, Optionally you can clean up the noise on the file by changing the 'Menu' | 'Tape' | 'Wave Amp' value increase this by 1 each time drop the tape back on to the emulator see if it loads and if its quieter on the noise? if it fails to load then the setting is to high and its corrupting the data and you will have to reduce this number and try again. Now we have rescued the tape data and cleaned up the noise lets save it, go to 'Menu' | 'Tape' | 'Save .Wav' - Choose a location and filename, the file which is saved is now a square wave so you can greatly reduce the size by zipping it up and the emulator can still open it as a .zip, NOTE: You need to set 'Wave Det' back to 'off' or the new square-wave file wont be recognised!
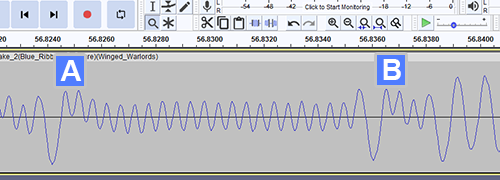
For some background, Due to the quality of some waves extracted from tapes this is a typical issue, note the
waveform flows up and down over the line, And at the marked points fail to cross the '0' line!?! Originally this would fail to register a pulse, But now with new detection software this is restored to a recognisable square wave.
| A | B | At these points the wave traditionally wouldn't be picked up crossing the '0' line. |
If you have not succeeded try recapturing and the steps again, If the error is on the tape itself you will need to manually look at the wave form in Audacity to see whats wrong!
Using the debugger and break points when the tape fails to load can help speed up the process as you work your way through the tape date manually redrawing the broken parts, Set the break point to where the code has realised there is a loading error more often than not @ #0008 'RST08' this will capture those error and open the debugger when they fire, Upon the debugger screen popping up the position of the tape in Minutes, Seconds, Milliseconds is displayed at the top, Open the .wav file in Audacity and scroll along to the point it has stopped at check the wave for any looking abnormalities, You can move the wave points manually to build a better pulse then re-export the file, close the debugger re-drag the new file onto the emulator and see if you get further each time you repair a problem pulse you make it to the next issue until you get tot the end at which point we hope its finally loaded, This can work and has been done on a number of important tapes which struggled to load, however there can be a tape which is non-repairable if the data has been erased then you'll have to do more digging, its not for the faint hearted or anyone that wants to keep their sanity it can take hours to repair a 5 minute tape manually with many errors! But when you get to the end its so rewarding watching it load again and again!
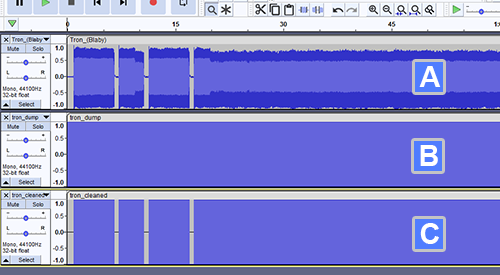
Visually 3 stages of restoring an old tape data.
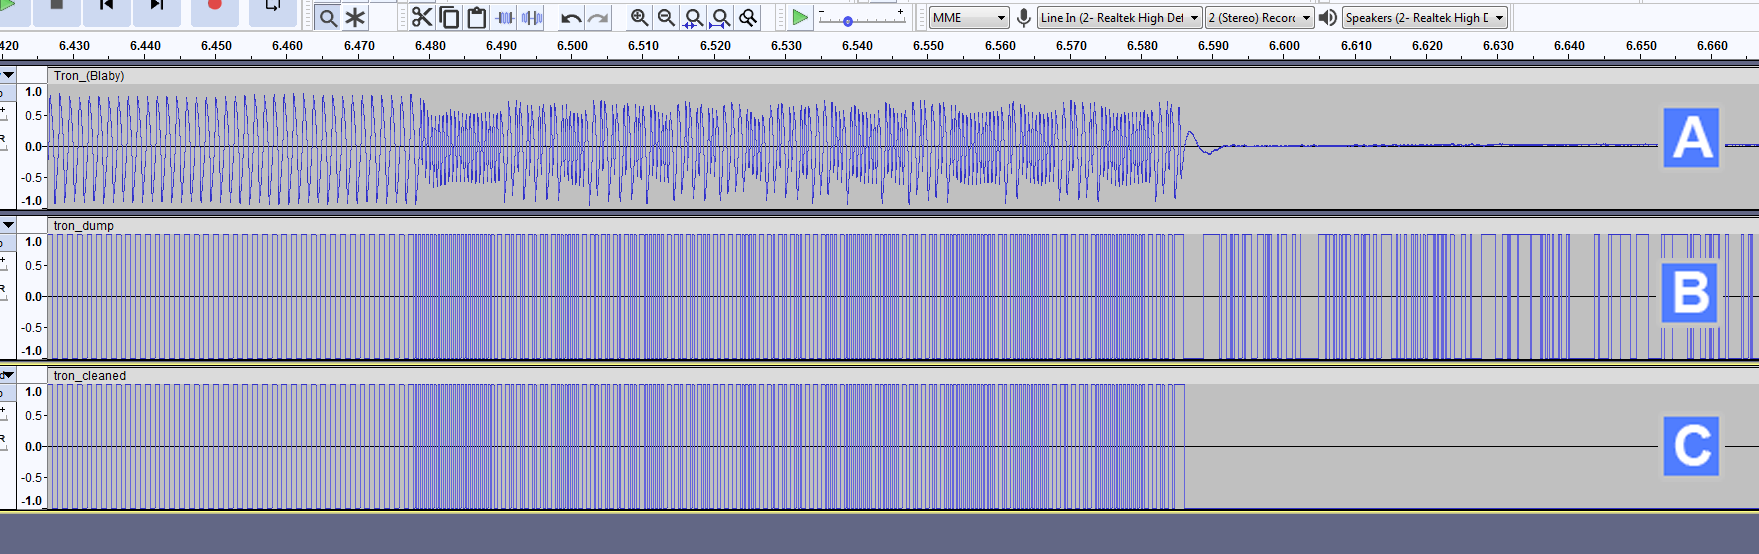
As above in more detail (click image for fullsize)
| A | The original wave, with messy amplitude and various noise!!! | |
| B | Wav Det on the emulator has analised the pulses and converted it to a crisp square wave. | |
| C | wav Amp now enabled the noise is removed to leave a nice clean square wave |
We wish you 'Good Luck' and let us know how you get on!
Using the navigation menu on the right please read the Help documentation before e-mailing questions on "HOW TO"
However if you are unable to find what you are looking for please use the contact page as there may be others with the same question and we can answer it here for future reference.
Thanks for reading, please if you can help out do so - Enjoy ZXSpectrum4.net Team.
FAQ
Help Navigation
| System Requirements |
| Loading a tape | |
| Saving a game | |
| Using a joystick |
| Frequently Asked Questions |
| Hardware | |
| Fast Loading | |
| Mouse | |
| Poke |
| Spectrum Keyboard Layout |
| TV Screen Layout |
| Tape Deck Layout |
Advanced User Tools
 Sound Lab - SL ZX4 RS-1
Tape Preservation & Restoration
Printer
Network
Z80 Assembler
Debugger
Poke / Cheat / Trainer