home |
emulator |
tapes |
information |
help |
contact |
Help: Sound Lab & Tape Restoration
Introduction
The Soundlab "SL ZX4 RS-1" provides a set of tools to visualise and repair/restore/rebuild your captured cassette tape images.
Registered users now have powerful capabilities to fix and load old / damaged tapes, Ones which a real spectrum would be unable to load!
Preparation
Firstly we will need a tape image to work on, So you'll need to capture this via your PC, help on this can be found here Tape Preservation & Restoration
A good capture to start with is most important, It can save you a lot time and in fact be the difference of getting a successful result at the end of all this! If you are able to use a stereo tape decek even better this can double your chances of success along with a good quality tape deck (that doesn't mean expesnive) one that produses a clean crisp wave. You can purchase second hand HIFI tape decks they tend to work very well.
A little advise on buying one for this purpose... A well known mid/high end quality brand from the 80s like Pioneer, Technics, Akai, will usually perfom better than a new cheap tape deck, but you don't need to spend £100s or even £1000s! on top end deck like Nakamchii (must be nice) to caputre the signals we are hunting out.
Keep in mind the cassette decks can be as old if not older than the Spectrum itself so after 40 odd years there is a high posibility the rubber belts will be perished (unless they are direct drive, again must be nice) replacing the belts tends to be fiddly, time consuming and belts themselves can be pricey so keep this in mind also and take your best option to buy and fit new belts or buy a working tape deck, With the cassette decks now being retro they too can demand a hefty price tag so keep your eyes open for a bargain! Most tape decks will work fine like the old traditional portable tape decks (datacorders) can work just as well, so if you have one lying around try that first! As with all the casssette decks each one would need tested to see how it performs.
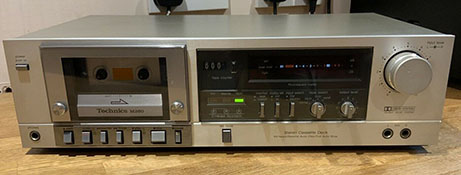
The Technics M260 from the early 1980s
used for captureing tape images
Sound Wave Display
Lets get to grips with some of the terminology so we can get stuck in.
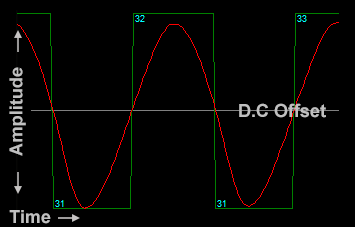
The above diagram is a quick overview of our wave being displayed
Amplitude : the strength of the wave postitive/negative.This represents the travel across the 8bit range from 0 to 255 bits. 128 being the level of our initial 'Zero' line to represent postivtive/ negiteive values.
Time : The tape will play @ 44100hz (44100 sample bytes of Amplitude per second)
D.C
Offset : Theoretical 'Zero' line which can be adjusted to create a D.C Offset
Original Wave Input : in Red
Square Wave Output : in Green
Square Pulse
Lengths : in Cyan length values shown for both positive and negitive parts
Our Spectrum reads the tapes we play to it via the ear port (Original Wave Input), A few capacitors and resistors as a filter to the ULA and then connected through to the CPU (Z80) Here we can read the value via the IN port command and the resulting bit willl be either 1 or a 0, High or low voltage (Square Wave Output).
So by adusting the volume on the physical tape deck the voltage levels are being adjusted which are seen by the electronics inside the spectrum Amplitude too high and we will see prolonged values Square Pulse
Lengths too low and the vlaues will be too short. Although there is a large margin for adjustment this still should be set optimally for the best chance of success, So when captureing (digitizing) our original wave we look to get the wave around 90% across the Amplitude without clipping the wave at the top or bottom (or atleast not too much)
Sound Lab - The Controls
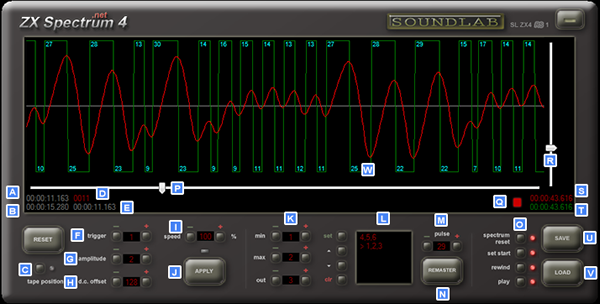 Click on the image above to see larger version of the ' SoundLab SL ZX4 RS-1'
The Sound Lab uses a work flow from left to right and the controls are mainly split in to 3 stages
Stage 1: On the left the controls (most commonly used) adjust the overal speed and interpretaion of the orginal wave coming in, detecing when is a pulse and for how long.
Satge 2:
In the middle (rearly used) are the REMASTER tools which take the resulting pulses from stage 1 to be adjusted for a given range to a new definded length (plus indivisual pulses can be adjusted)
Stage 3: On the right are specific settings on how Sound Lab interacts with ZX Spectrum 4 Emulator O .
| A | Time position which we are looking at along the Square Wave Output | |
| B | Time position which the Spectrum tapedeck is currently at | |
| C | Follow tape position as it plays into the Spectrum emulator | |
| D | Time position in seconds only at which the spectrum is currently at, used for .toc files | |
| E | Time position to start tape when loaded into Spectrum enabled using the set start' O | |
| F | tigger How many rising/falling values Original Wave Input before we declare a positive or negative pulse edge | |
| G | amplitude How strong must the trigger need to be (usually left at 0 to ignore) | |
| H | d.c offset Alternative to trigger only detect Original Wave Input edge when crossing this line (Zero = 128) | |
| I | speed Compress or stretch the Square Wave Output by this % (default 100) | |
| J | APPLY The settings above before moving on to any next stage | |
| K | Replace Square Wave Output pulses > min and max < with new value out (set to add to L remaster list) | |
| L | The list of remaster values set using K above | |
| M | pulse Indivisual length resize click on any of the length numbers W and set new value click the new value to clear | |
| N | REMASTER press this to apply list before moving on | |
| O | Options to tape deck when you load, Automatically reset spectrum go to position W rewind tape and play tape | |
| P | Track slide to ff and rew tape to desiredf position | |
| Q | Play/Stop tapedeck | |
| R | Zoom in/out on display | |
| S | Total (time) length of Original Wave Input | |
| T | Total (time) length of Square Wave Output | |
| U | SAVE Square Wave Output to .csq (compressed squarewave file) | |
| V | LOAD Insert the new Square Wave Output in to the Spectrum using the settings O | |
| W | Square Pulse Length double click to edit these using M |
Using SoundLab
Once you've captured your tape in 8bit mono 44100hz, Open the .wav in the emulator and navigate to Menu | Tools | Sound Lab
The first thng to try is does it load in default settings?!! Over at the Spectrum screen press 'turbo' or this could take a while but note don't use 'Fast Load' in the settings. In the Sound Lab press tape position button C and then press LOAD
SoundLab will stream the Square Wave Output and follow as the spectrum attempts to load it, if this worked you're done, Press SAVE and give your new file a (meaningful!) name.
if it failed then we can try a few settings, scan along the Original Wave Input using P looking at how high or low the wave is sitting does it oscillate around the d.c offset line ? If not you can higher or lower this by adjusting H when set at a better position press APPLY to see if it has given a clearer Square Wave Output you can then press the LOAD ? if this worked youre done, Press SAVE and give your new file a (meaningful!) name.
Did it still fail?! O.K lets try another way, set the H back to 128 by pressing RESET now set the tigger F to around 4 (its a good number) this is telling SoundLab that there needs to be 4 consecutive samples (bytes) increasing in amplitude to signal a rising edge (positive pulse) and 4 decreasing to signal a falling edge (negative pulse) You can adjust the sensitivity by using F and then pressing APPLY to see the effect it has on the Square Wave Output too high and pulses will be missed too low and noise will be picked up as pulses, when set you can then press LOAD ? if this worked you're done, Press SAVE and give your new file a (meaningful!) name.
If that is still not succesful switch from using the tigger tool and repeat the above step using the amplitude tool.
The
amplitude tool will use the vaule provided to detect a wave in the same way the tigger tool does but will measure the length of time from the peak to the dwell (vice versa) of the pulse and create a mini D.C. Offset each pulse, thus taking the measurement for their own datums. This allows for a wave which moves up and down over the amplitude scale and not just consistenlty high or low
.Tip: for both the tigger and amplitude tools:: Start with a setting of 1 and increment it by 1 each time it fails to load, Once you get above 10 its unlikely to be successful using this method alone.
Still having trouble...? We now need to understand a little more detail on the data we are looking at in order to choose the next steps.
When a Spectrum is first switched on and asked to LOAD from a cassette tape it uses its (standard) built in loading routine inside the ROM, This sets the Spectrum up to expect pulses of certain sizes structured into a particular arrangment, please see below.
T = tstates clock pulse (an amount of time the crytal/oscillator) takes to trigger the Z80 @ ~3.5Mhz per second
therefore in order for our tape image running at 44100hz to match speeds our multiper of 79.238 is used,
This is dervide from 69888T per interrupt X 50hz =
3494400T per second / 44100 wave bytes per second = ~79.238T
So 1 sample wave byte takes 79.239T states
to pass.
Stanadard LOAD'ing Routine
1: A leader pulse consisting of more than 8000 high low values at 2168T in length, Using our above calculations thats 2168T / 79.238 = 27.3 bytes in the wave (pulse) length
2. At the very end of the leader pulse's should be 2 sync pulses of around 700T (give or take, 1 is biugger than the other) 700T / 79.238 = ~8 bytes in the wave (pulse) length
3. Finally the data, This is either a header or code, either way consisting on '0's and '1's in pairs with the length of around 2 x 855T / 79.238 = 10.7 bytes in (pulse) wave length and 2 x 1710T / 79.238 = 21.6 bytes in (pulse) wave length
With the above in mind if we are trying to load a standard LOADer piece of code we can check pulses for length to see if they are far larger than they should be or far smaller again theres a lot of room for movement but you can use the speedcontrol I to shrink or grow the overal pulses adjust the size by few % and press apply you will immedaitely see the effect it has had, You can then press the LOAD and see if its better you'll then chnage a bit more if it fails and try again... then repeat. Wow and Flutter from the cassette deck and or tape in the original wave can play a part of stretching and compressing the wave across its entire length so things can speed up or slow down at any point, best option is not to get to held up on this (the spectrum has a great deal of wriggle room here) and if the leader has pulses from 26 - 31 you should be fine (consistently is key) if all the pulses were 32 or greater then its quick and easy just to try a speed up (to bring the lengths to around 28) and test again, You may have a slow cassette deck through age and all the tapes may come out slow this is easy to work with and you'll get to know the deck if you do a lot of captures.
If thats not the problem then you'll need to start scanning through the wave to see at what point its failing and adjust the wave manually pulse by pulse or use the REMASTER list L
A helpful tip to aid you with hunting down the loading error is to use the debugger if its a standard LOAD'ing tape then place a break point at address #0038 this will capture the "r tape loading error" at which point you can see the time of the tape which the error occured, If its a custom LOAD'er though then attampt to LOAD the tape with your finger over the F12 (debugger break) key and as soon as it crashes hit the F12 and add a break point here, disable break points check box untill you start the tape LOAD'ing sequence again then press F12 and re-enable break points check box and wait until it catches the error this should get you closer where the error is on the tape to inspect it.
Theres more to help and info on preserving tapes over @ Tape Preservation & Restoration
.toc File Creation
When backing up your tapes you'll remember back in the 80s using fast fowarding and rewinding on your C90 tape as you hunt for the start of your prgram or another level/data well now you can create pointers to the differnet programs on the tape and with a single click jump right the correct position.
To create a .toc file is simple, Once you have your tape file .csq or .wav open note pad or any text editior and create a empty file in the same folder as your tape image with the name + a suffix '.toc' e.g. 'mytape.wav.toc'
Inside the file each line needs to contain a 4 digit number (tape counter in seconds with leading zeros) which points to a position on the tape followed by a sperator ;; then the label that repesents this marker (don't use ;; in the name!)
Example:
0000;;My Program 1
0120;;My program 2
0200;;My Game
0350;;Level 1
0420;;Level 2
When opening a .wav or .csq file in the emulator if a .toc of the same name exists it will also be opened and shown in the tape deck, by clicking on any of these tape labels you;ll beasked wether or not to reatart the Spectrum, the emulator will then automatically jump to the tape postion and play from there. Easy days!
We wish you 'Good Luck' and let us know how you get on!
Using the navigation menu on the right please read the Help documentation before e-mailing questions on "HOW TO"
However if you are unable to find what you are looking for please use the contact page as there may be others with the same question and we can answer it here for future reference.
Thanks for reading, please if you can help out do so - Enjoy ZXSpectrum4.net Team.
FAQ
Help Navigation
| System Requirements |
| Loading a tape | |
| Saving a game | |
| Using a joystick |
| Frequently Asked Questions |
| Hardware | |
| Fast Loading | |
| Mouse | |
| Poke |
| Spectrum Keyboard Layout |
| TV Screen Layout |
| Tape Deck Layout |
Advanced User Tools
 Sound Lab - SL ZX4 RS-1
Tape Preservation & Restoration
Printer
Network
Z80 Assembler
Debugger
Poke / Cheat / Trainer